Thursday, July 30, 2009

Finish is next

Final shots before finish goes on...


Really like doing mock ups... One more set...

tuners

Headstock reworked. I plugged holes with 1/2 tapered plugs covered in epoxy. They still tried to chip out as I drilled them but I won this time. The plugs are completely concealed by the tuners and the recess on the from of the headstock.

Monday, July 27, 2009

Super progress

Neck Glued...


Heal Shaped

It never ends

Tuner drilling followed by complete "oh sh!t".
So I marked off my tuners. Attached my plate to keep the headstock level. (BTW I am doing this much earlier in the build from now on.) Picked out my 1/2" forstner so I could cut my tuner recesses first. Went in the house for a minute because real life (wife, kids, dogs) was calling. Came back out and started drilling. All the way through the headstock. Crap crap crap.... These were only supposed to be the recess for the tuners. So now I have to plug the holes and re-drill the 11/32". I am not as worried about aesthetics as I would be on a customers guitar... still sucks. I doubt anyone will be able to see it because the tuners will cover the 1/2" hole. It sucks because I know it happened. I ordered a new expensive plug cutter from Lee Valley/Woodcraft.


The headstock needs some reworking anyway. I used my 8 string template and frankly it is too large. I have the holes drilled for straight pull. Next up... cut the headstock down to fit the tuner placement, plug the holes, reduce the thickness.

Progress Red Star

Neck Glued -- Heal shaped...


One more look at the body before I stain it black...

Friday, July 24, 2009

Starting to looks like a guitar

Glued the neck up. Tomorrow I will spend some time cleaning up the heal joint.

Non-tremolo hate

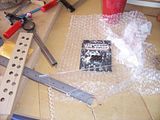
Installing the Hipshot bridge. I would say that the non-tremolo string through bridge is as hard to install properly as a Tremolo... I am using a technique I picked up here on the forum... works well enough for me. I made a plexi template from the bridge itself.
Start by disassembling the bridge.

I double taped the bridge to the plexi, set the fence on the drill to match the depth, picked a bit that fit holes in the bridge. I then drilled very shallow holes in the plexi.
Next up removed the bridge and proceeded to drill the plexi template the rest of the way through.

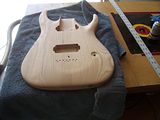
Next I align the bridge and install it on the body. I used the drill press to drill the 2 outside holes all the way through the body. Taking my time and backing the bit out as it fills up, trying to make sure it doesn't drift. I drill the inside holes shallow.
Next up removed the bridge and proceeded to drill the middle holes about 1" deep. I flip the body over and attach my template using the 2 outside holes to line it up. Back to the drill press and finish drilling my holes. I now have 5/32" holes all the way through the body.

I use my countersink bit in the drill press to center and drill the holes for the ferules,it even does a good job at countersinking the lip of the ferules.

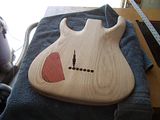
Since the body is Northern Ash and hard as a rock, I then come back with a slightly larger bit and finish the holes. That is it.

Lots of saw dust today...

Christmas in July...

And...

And...

Super secret upcoming projects.


A little headstock work


Sunday, July 19, 2009

More plate this

Electronic cavity plates. This is how I do it. The pros might do it other ways. I don't like large cavities so I only make them big enough for the controls I am using in the guitar. A lot of mine are single push/pull volume knobs so they are done with a 1 3/8" forstner. On the SuperRG I had 5-way, volume, tone on a carved top and back. I did most of the cavity with the forstner then cleaned up the bottom with my dremel by hand. If the guitar is flat I will do it with a router but since the carve makes it hard to use a regular router. A pin router would be great but who can afford that.


After getting the control cavity designed I make a plate. The plates are usually custom to the guitar but I try to base them from something you can buy. Like for this build it is an RG electronics cover. I run the piece of wood through the drum sander till it is the right thickness and cut it out with a scroll saw. I touch up the curves with the belt/disk sander. Align the grain of the plate with the back of the guitar and trace a line around it. I use the big router to rough in the recess. Then I cut up to (leaving) the pencil line with my dremel and a large cutter. This part is a feel thing.


Next up are some small neodymium magnets. Using a 5/16" brad bit I drill a hole and use a block to tap the magnet in. A little CA and some accelerator and we are done.


On the back of the plate I use the dremel, set to the depth of a small washer and route a recess.

I then use some thick CA and glue my washer in place. Sand clean.


On the curved body I wet the plate and clamp it in place until it dries.

Usually this makes the plate curve to the body. If not the next thing is to soak in hot water, clamp in place, use a heat gun.


Trussrod cover. 5/16" mag on the plate, magnet in the headstock.